 |
|
Contents
|
|
|
|
|
|
|
|
|
|
|
|
|
|
|
|
|
|
|
Key West, Florida
|
When I purchased Knight Hawk the original combination engine driven / 110 volt refrigerator system had been compromised. The system had a refrigeration box with holding plate adjacent to the sink in the galley and a rather large freezer in the main deck with two holding plates. All holding plates had two sets of refrigerant lines, one set connected to a 110 volt compressor and the other set connected to an engine driven pump. According to the previous owners the system stopped working although I never was able to find out from them exactly |
||
|
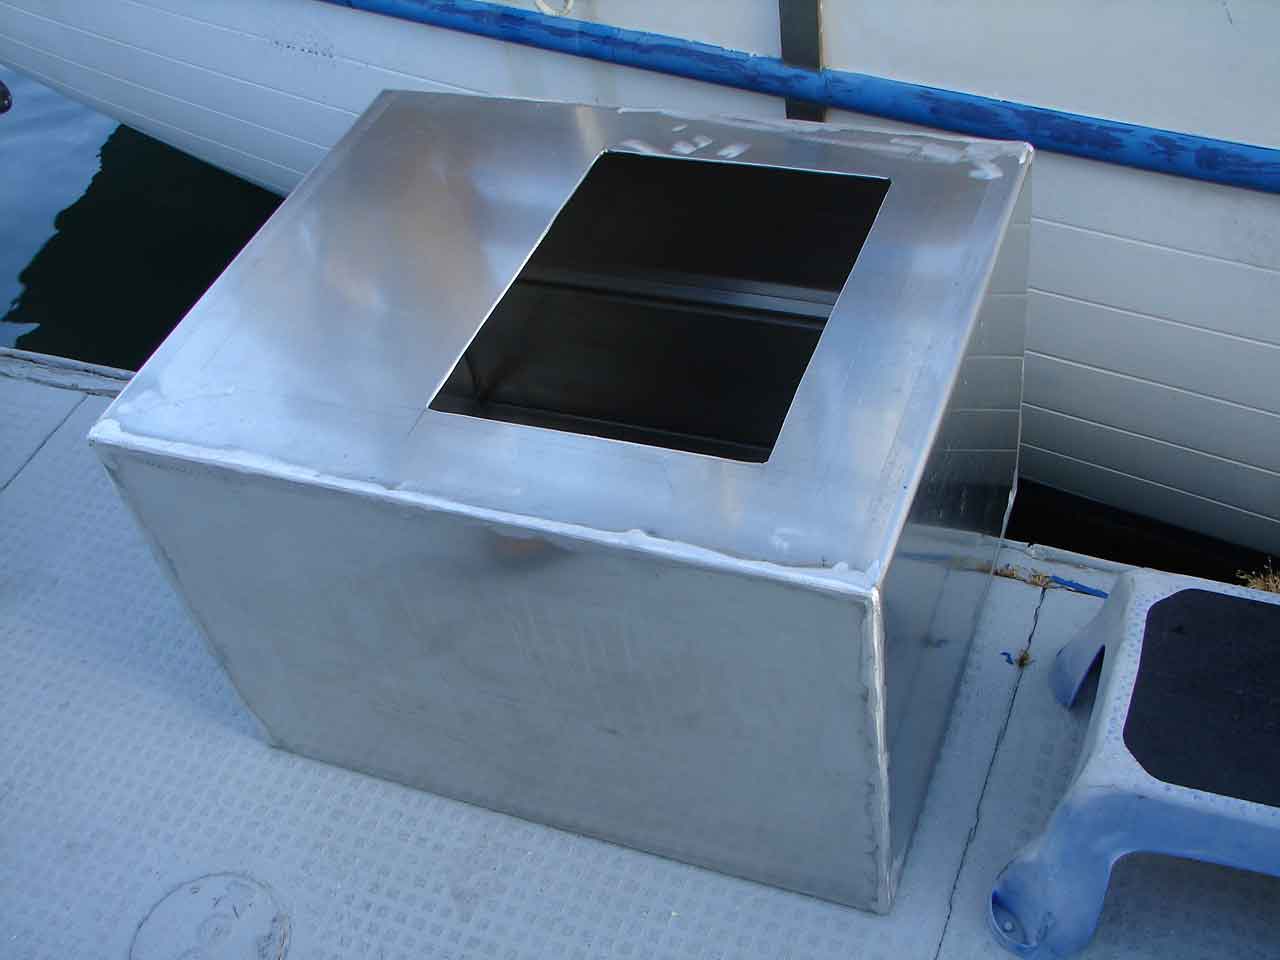
what the issues was.They were told it would cost $1000.00 to make it right. They decided rather than make the appropriate repair they would instead take a saw and cut out the box nicely enclosed in all that beautiful teak, leave a totally unfinished area and stick a small dorm type refrigerator in it's place. Problem solved. Well, only if you planned to keep the boat in the harbor that is. And only then if the trip were of short duration so the thing would stay cold until you returned to the dock. For obvious reasons this wasn't exactly going to work for cruising. My original plan was to restore the system to it's former self. But since the lines had been cut through along with the wood air and moisture had contaminated the compressors and lines. I was sure the seals and bearings would also have been compromised at this point. So I needed to come up with a new plan. |
||
 |
||
|
I knew that the newer systems were much more efficient and I didn't want to use the boats engine as part of the system. No sense in piling up lots of hours on the old Perkins 4-107 just to keep the beer cold. I jumped on line for days and searched the endless internet for systems. About the same time I was pondering all of this my friend Mike comes along and reminds me that he had just completed installing a new system in his boat. So I grabbed a few beers from the dorm fridge and headed over to see what he was using. It didn't take me long to decide this was the system for me. The system I decided to go with was the Frigoboat K50-SSC water cooled with keel cooler and would utilize a holding plate. This system uses a Danfoss BD50F compressor, which operates on 12 /24 volts, uses about 6 amperes at it highest speed (there are 4), and uses R-134A, the same stuff your car uses, which makes it easy for you to maintain. It uses a TempTech electronic thermostat and controller unit, and a stainless holding plate with a eutectic that freezes at 12 degrees F (-11C). With this system I could support a box size of 5 cubic feet. The holding plate would be located at one end and a small movable divider placed in the box to provide a separation. Anything placed close to the holding plate on one side of the divider will freeze (except ice cream), on the other side of the divider the temperatures would be just above freezing. Sounds like really cold beer from here on out! I ordered the system from Great Water, Inc. in Brunswick, Maine and had it shipped to California. I have to take a minute here to say that the folks at Great Water were absolutely fantastic to work with. I talked at length to their technician and we designed the system with ease. Throughout the life of this project they were always willing to take my calls, answer all of my questions and they did it all with a friendly and caring attitude. I had thought this kind of service had all but disappeared from the face or the earth. I highly recommend them if you are going to venture down this road. While I was waiting for the system to arrive Mike and I worked
on designing the box. I wanted the system to match the original
as far as the exterior was concerned so I settled quickly with a
teak exterior and matching lee rail. I'm not a carpenter in any
way, shape or form, I do electrical and refrigeration. But Mike
has a way with those sharp tools necessary to make the wood all
come together so he graciously offered, after a bottle of wine had
been emptied, to help with the project. |
||
|
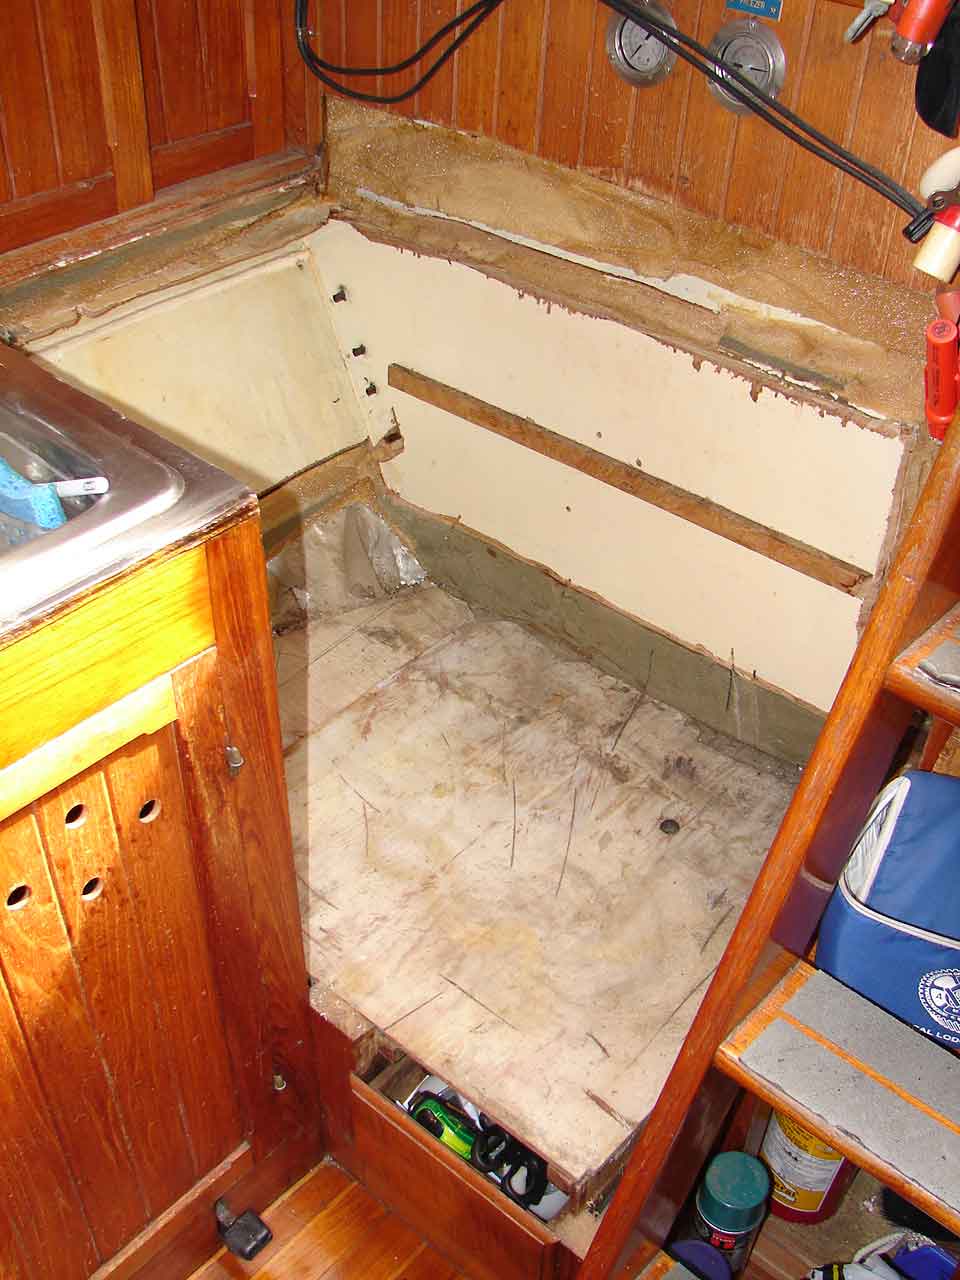
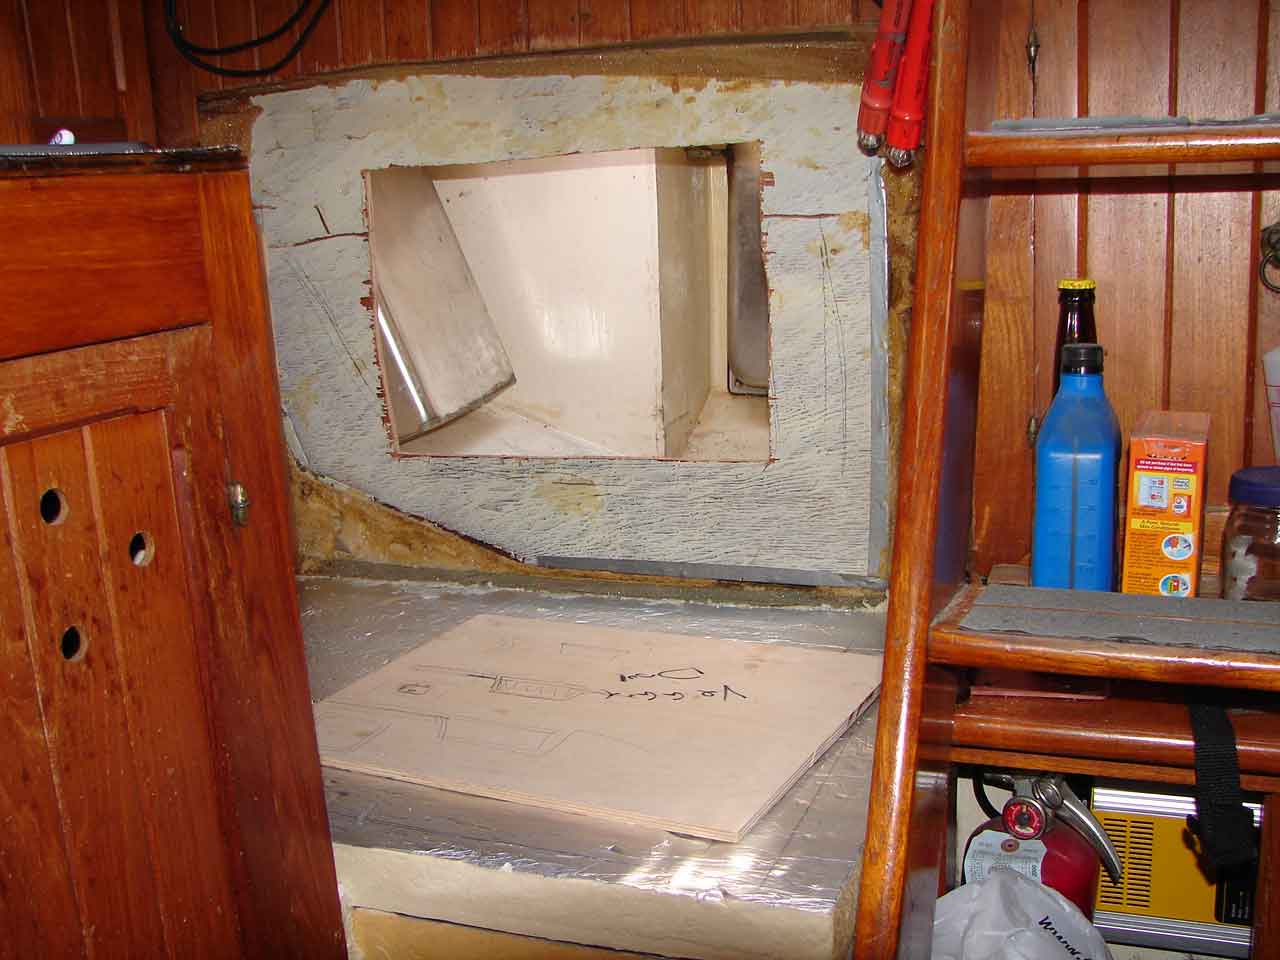
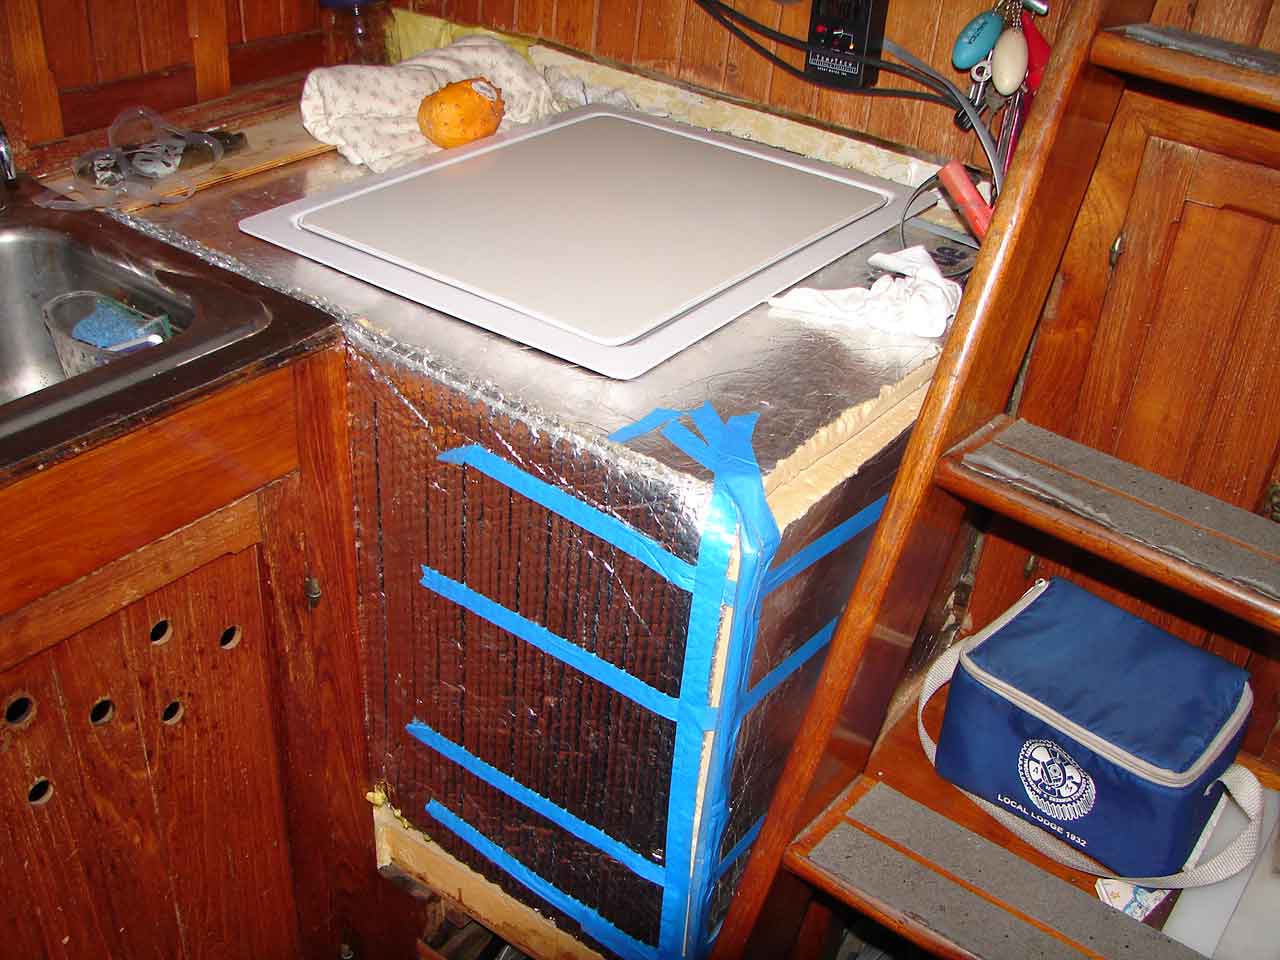
We decided that the interior of the fridge would be an aluminum box making it easy to clean not to mention Mike had a friend that could build it for me. We quickly drew up the plans and took them to Mike's friend to have the box fabricated. This was finally starting to come together, or so I thought. My plan was to have it all done within a month once we started in. But it turned into a very long project. Not that it couldn't be done in a month, it was the procrastination factor that took hold. The first thing we did in the boat was to remove all the old copper refrigerant lines in the work area and also cut through to the old freezer to remove the old holding plates. Then we closed up the hole, sealed it and started to frame the area. We used plywood treated with copious layers of West System epoxy to form the bottom and hull side of the area. Next we filled the voids between the plywood and hull with foam insulation. Between the hull and the side of the fridge there is about 8 inches of foam and another 4 inches of foil faced insulation (two 2-inch sheets). We laid two more sections of 2-inch foil faced insulation on the plywood bottom and about 2 ½ inches of insulation on the back where the wall was for the old freezer. Next we prepared the new aluminum box for its installation. We bathed the exterior with muriatic acid to clean it, rinsed it, let it dry and then spray painted it with zinc chromate paint. This would insure that the box would not corrode it's way out of existence before the boat had ended up on a scrap heap some where. Then the bracket that would allow us to mount the holding plate was installed and the bolts trimmed. So far so good. Next we needed to install the box into its final resting place. I had thought ahead and measured the hatch opening when we designed it to make sure we could get it |
 |
|
 |
||
 |
||
|
in the boat. I didn't want to be like that guy that spent years building a plane in his basement and then couldn't get it out. What I didn't consider was the fact that the space it would occupy was somewhat recessed so when you tried to slide it in the space between the sink cabinet and the forward most bulkhead was a bit smaller. As we started to slide the box in it went about ¾ of the way then came to an abrupt halt. Well, we didn't come this far to be outsmarted by some aluminum and wood. If I remember right both of those things have some give to them. We just need to apply the right amount of force in just the right area and it should come to rest in it's new home. So, with several well placed kicks it completed its final journey. Note to who ever buys this boat in the future, the refrigerator is NOT going to come out, EVER! Now we needed to place insulation on the remaining two sides and the top. Once again some coaxing was necessary to get the 3 inches of insulation in place between the box and the sink cabinet. Then 4 inches of foil faced insulation |
||
| was placed on the end. The top only allows for 2 inches due to the top loading hatch that was purchased for the project. Next the holding plate was bolted in place, the temperature sensors were put in place and wires run. Besides the electronic temperature gauge I also installed two capillary gauges. One measures the temp low and near the holding plate, the other against the top and as far away from the holding plate as I could get. Even if the electronic unit fails I can monitor my fridge and be confident. Then the hatch was installed. Hay, this is starting to look a lot like a refrigerator! We taped the edges and left it this way. In fact it spent an entire summer like that. Hay, you have to go sailing when the weather is right. | ||
 |
||
| It was time to install the
compressor and keel cooler and since I always look for ways to save
a few bucks it was decided that it would be done while in the water.
No sense paying for a haul out for a little thing like this. Obviously
installing the compressor was a relatively easy task. I placed it
in a small cabinet below the companionway, which is right next to
where the fridge is. A hole was cut between that enclosure and the
adjacent area and a small fan was installed that would turn on whenever
the compressor ran to help draw air through the area.
The tricky bit was installing the keel cooler. A 1 ½ inch hole needed to be drilled through the hull of the boat, well below the water line so that the keel cooler could be installed. Once again Mike was on hand for the days work. We hired a diver to spend an hour or so with us, as we would definitely need his help. The diver was given a toilet plunger and sent below. From the bilge we drilled a ¼ inch hole through the hull and left the bit sticking out. He located the protruding bit and placed the plunger over it. Now we were able to withdraw the bit and change it to a 1 ½ inch hole saw. Using the pilot hole as a guide we sent that on through the hull. I have to tell you, I have always loved the heavy construction of older, hand laid fiberglass boats. But this was the first time I had a chance to see how solid these things are built. When we removed the hole saw the plug of fiberglass that was stuck in it was nearly ¾ on an inch thick! This isn't a boat, it's an island! So now I am sitting here with a 1 ½ inch hole in the bottom of my boat and a diver below with a toilet plunger standing between King Neptune and me. I take the keel cooler and goop it with 3M's 5200. By the way, the keel cooler comes with a 5 foot refrigerant line attached. This entire thing is handed to my new best friend, the diver, and he takes it below. Then, we signal him with a sharp rap on the hull and he removes the toilet plunger from its post. Immediately the entire marina tries to enter the boat as water shot into the bilge. Then the tubing shows up and I grab it and pull it quickly to get all 5 feet of it inside all the while hoping that some man eating fish wouldn't find his way through the hole. As the flange starts to come through the hull the water subsides and the diver pushes the keel cooler home and seats it to the hull. I spin on the large nut that tightens this thing in place and as I take the last few turns the last drops of water stop. Note to self: buy a bigger bilge pump. I connected all the refrigerant lines, which come precharged with
refrigerant by the way, and then connected the electrical. Now for
the moment of truth, would it actually do something? I turn on the
switch and the compressor comes alive. After several hours the box
is cold and frost is starting to cover the holding plate. After
a day or so to let the system settle in I add items to my box and
note how quiet the system is. Unfortunately at this point in time Mike took his boat and headed north and so the finish woodwork he was going to do now needed to be done by someone else. I hired Tom Blada, owner of The Masters Vessel who is a shipwright and |
||
|
does great work. He jumped right in and got the job done for me installing a front and side panel of teak that matched the boat's interior, custom made teak lee rails, and a nice Formica top that matched the wood. And so the project was finished except for the varnishing. That I can do myself. The fridge looks fantastic, is very efficient and damn, are my beers cold now! I placed a water bottle in the back by the holding plate and it managed to freeze solid. The two capillary gauges now read about 28 degrees F (-3 C) near the holding plate and 38 Degrees F (3 C) at the very top furthest away from the holding plate. A hanging temperature gauge mid way in the box indicates 34 degree F (1 C). Pass me a beer! |
||
 |
||
